
指南
主程序目录结构
├─ Core
│  ├─ WHS.Infrastructure
│  └─ WPFLocalizeExtension
├─ Document
│  └─WHSDocumentation
├─ Plugins
│  ├─ WHS.App.Animation
│  ├─ WHS.DEVICE.AUDIO
│  ├─ WHS.DEVICE.MAPDESIGN
│  ├─ WHS.DEVICE.ROBOT3D
│  ├─ WHS.DEVICE.ROBOTNEW
│  ├─ WHS.DEVICE.SIGNATURE
│  └─ WHS.DEVICE.WEIGHT
├─ Setup
│  ├─ WHS_CustomAction
│  └─ WHSSetup
├─ Templates
│  └─ WHSPlugin5
│  └─  └─ WHSPlugin5
└─ WHS
环境
程序环境:.net5.0-windows
贡献
WPF框架 : MahApps.Metro 参考
MVVM:Caliburn.Micro 参考
日志:NLOG 参考
通信:DotNetty.Transport.Libuv 参考
ICON:MahApps.Metro.IconPacks.FontAwesome 参考
弹性和瞬态故障处理库:Polly 参考
文档工具:Sandcastle 参考
打包工具:WIX 参考
FluentHttpClient 参考
插件目录结构
├─ Properties
│  └─ Resource.resx //Images的图片加入到资源
├─ Actions
│  └─ActionDemo.cs  //websocket发来执行命令
├─ Images
│  └─plugin.png
├─ Model
│  └─ActionModel.cs //模型
├─ Resources
│  ├─ Strings.en.resx  //语言EN
│  ├─ Strings.resx     //语言默认中文
│  └─ Strings.zh-CN.resx  //语言中文
├─ ViewModels     //MVVM:DeviceView
│  └─ DeviceViewModel.cs
├─ Views          //视图
│  ├─ DeviceView.cs
│  └─ DeviceView.xaml
├─ DevicePluginDefinition.cs //插件配置定义
└─ plugin.def       //插件定义
多语言
主程序多语言
在WHS程序集的Resouces文件夹下添加一个语言资源,系统会自动识别出语言所属的culture
推荐在VS中安装一个插件ResXResourceManager
如图: 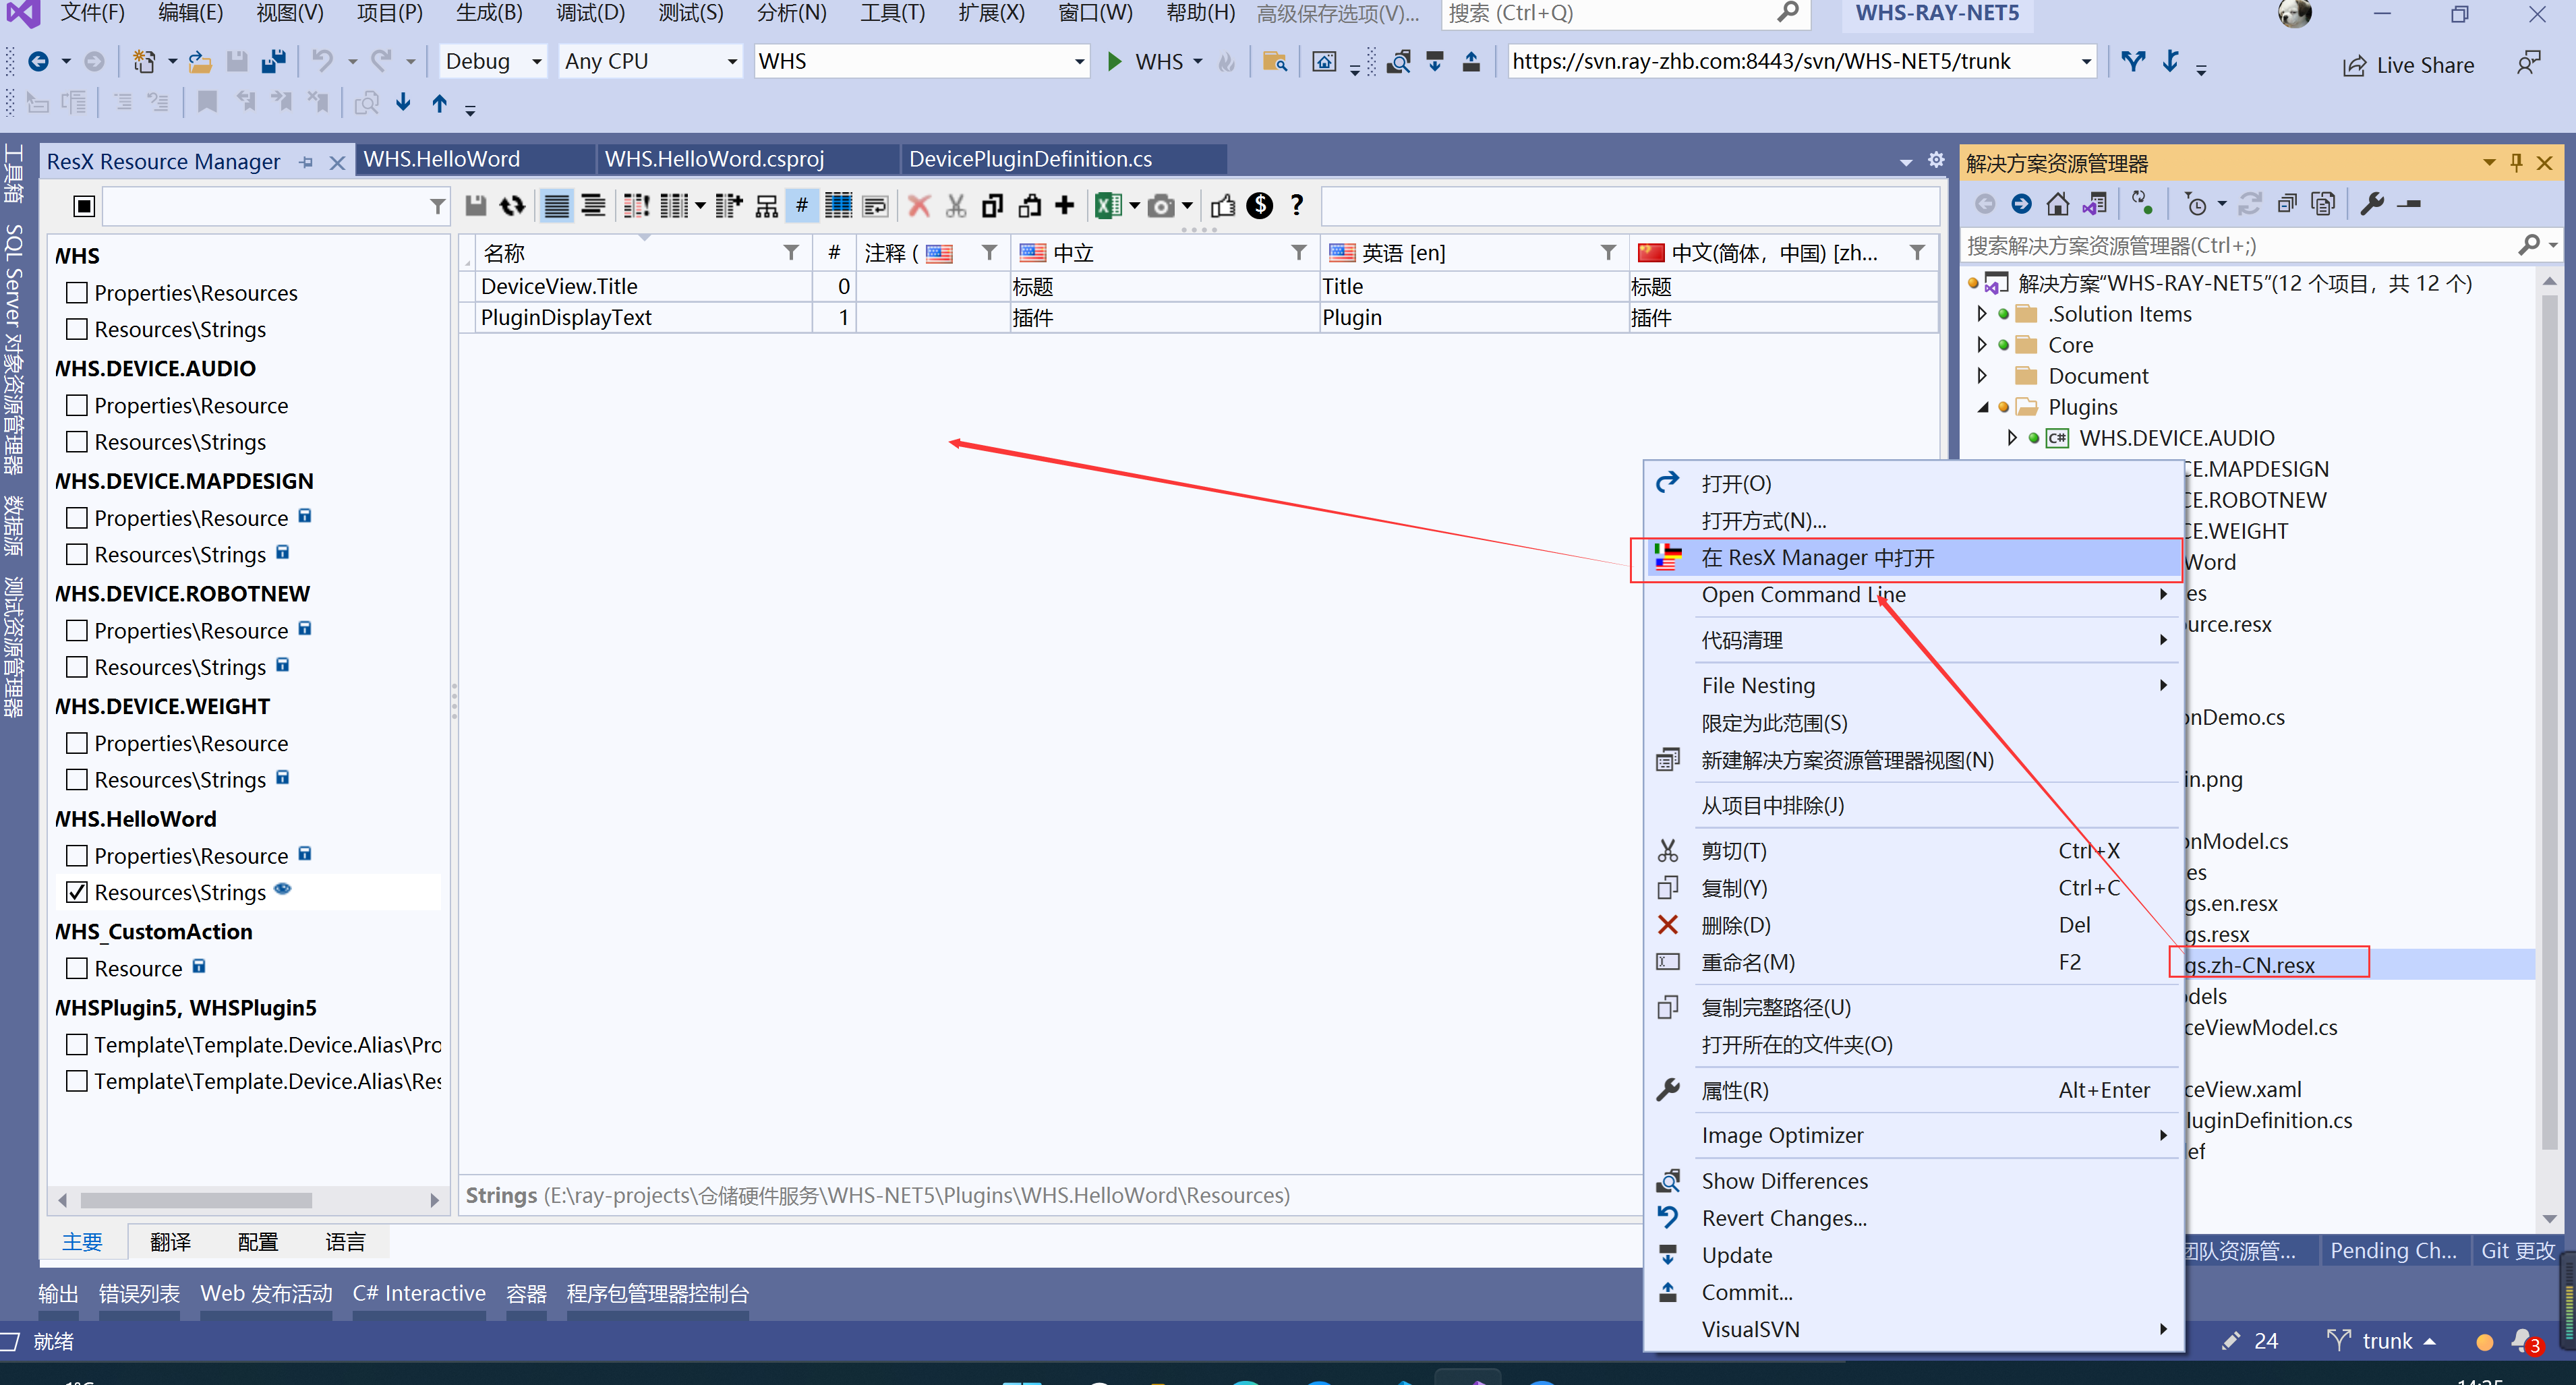
插件多语言
当主程序添加了一个语言后,插件也需要添加相应的语言资源。
同时在编译后命令把插件生成的语言文件夹COPY到主程序的Plugins文件夹中
如图:
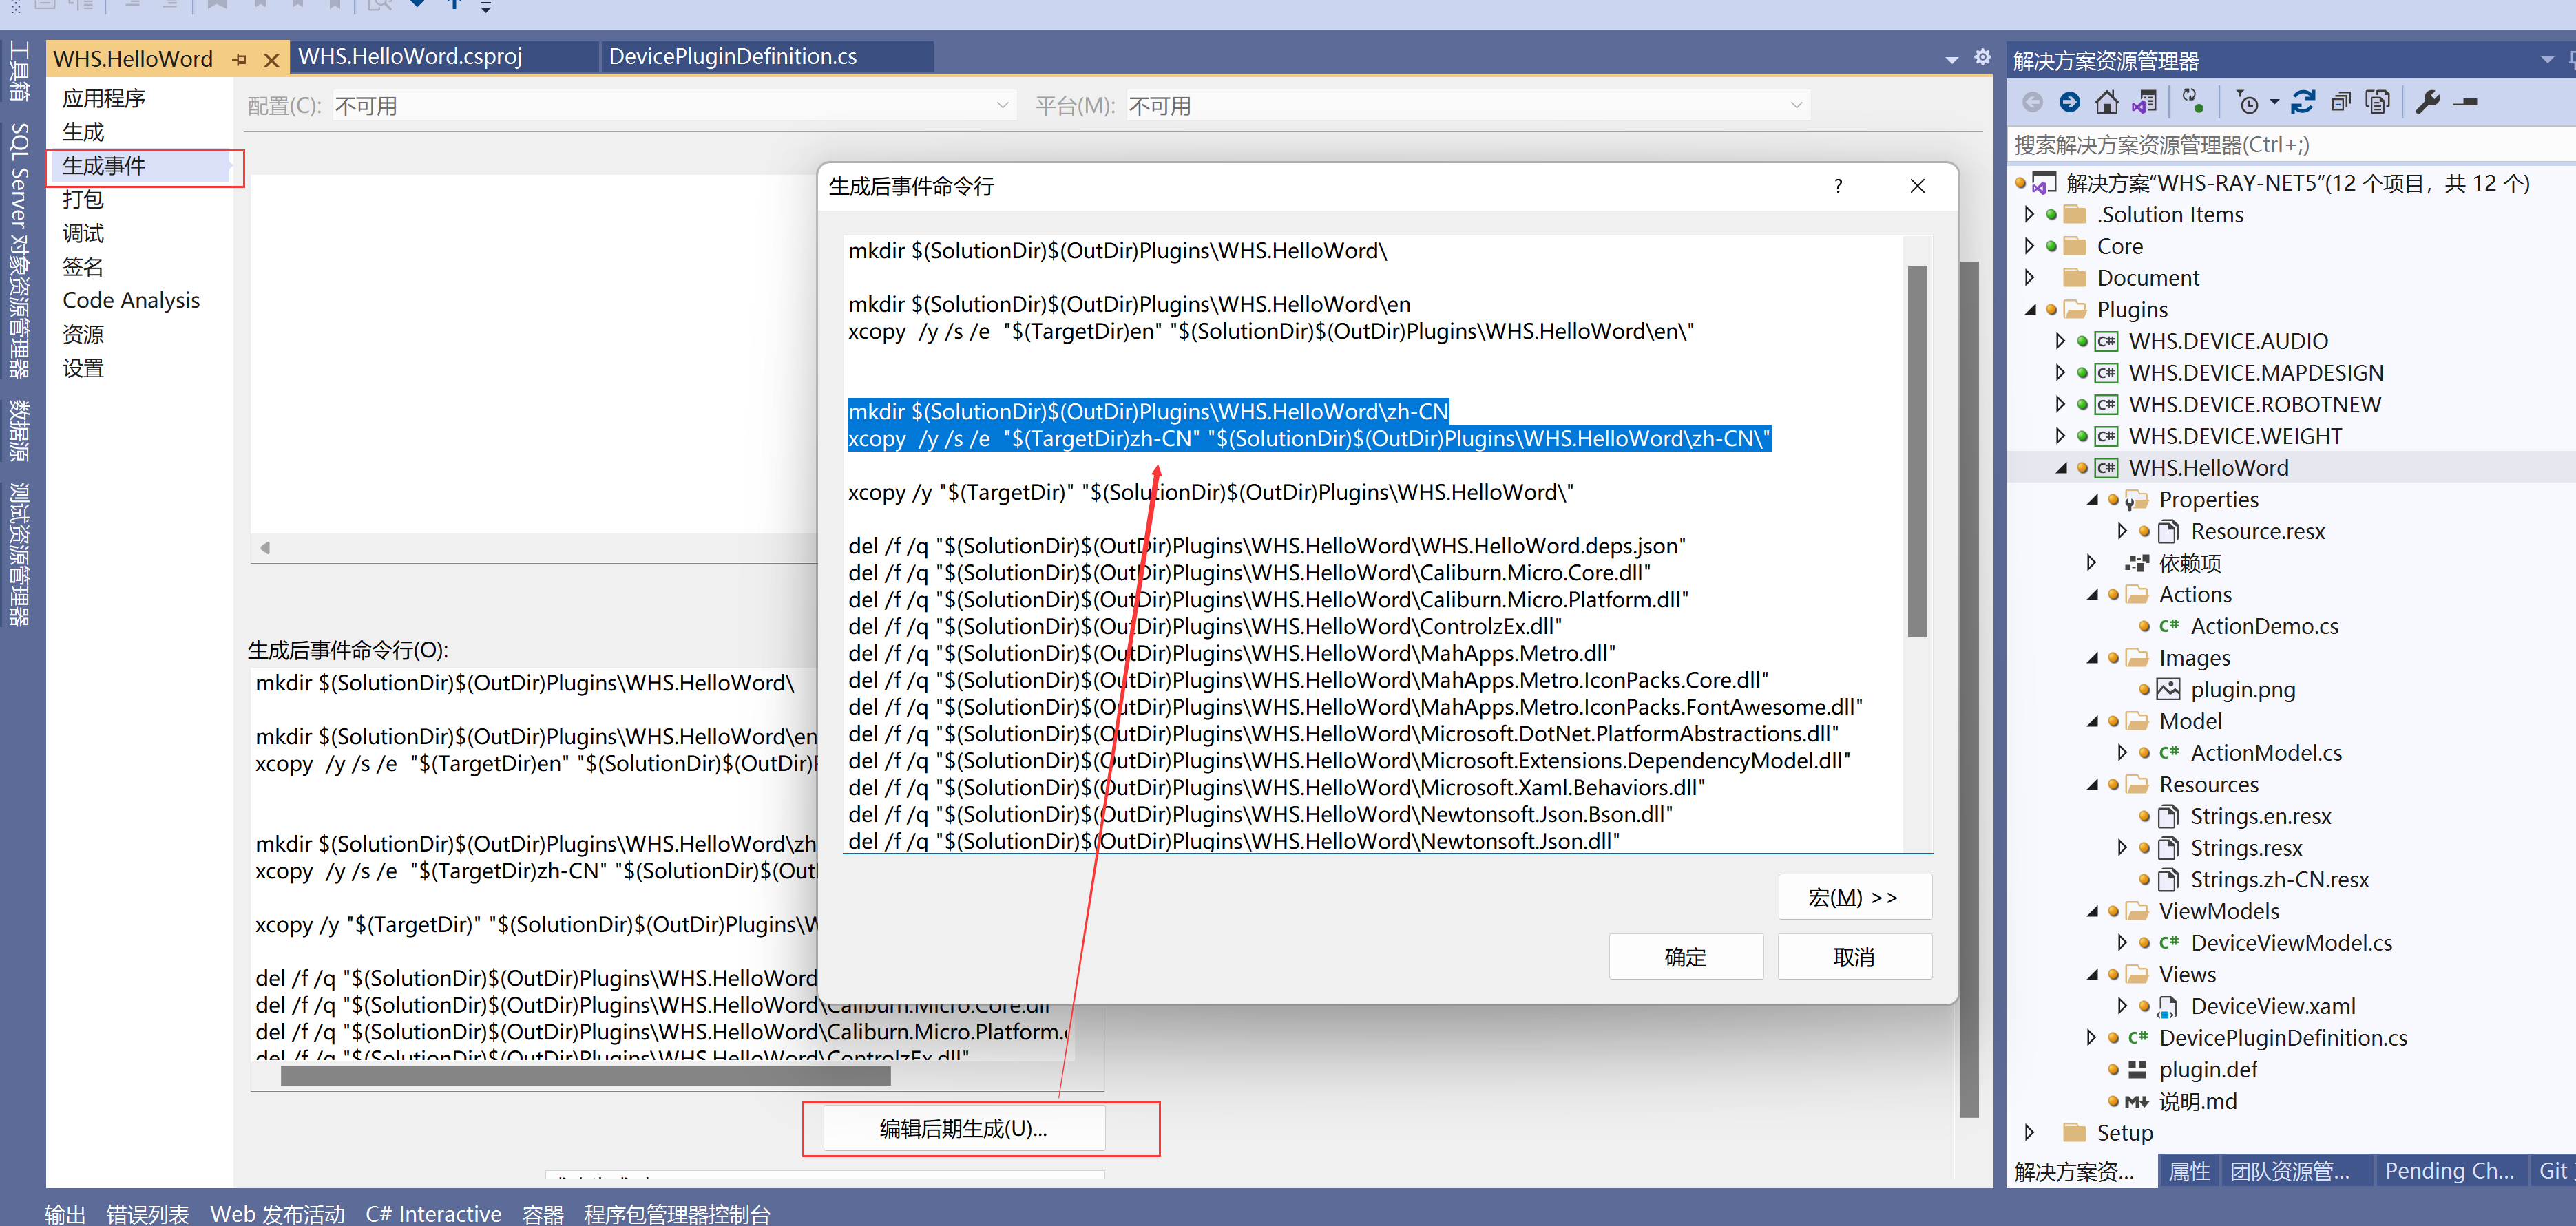
mkdir $(SolutionDir)$(OutDir)Plugins\xx-pluginname-xx\xx-languageName-xx
xcopy  /y /s /e  "$(TargetDir)xx-languageName-xx" "$(SolutionDir)$(OutDir)Plugins\xx-pluginname-xx\xx-languageName-xx\"
提示
xx-pluginname-xx 插件目录
xx-languageName-xx 语言名称如:zh-CN,en
视图
View继承Page,这是因为主窗体使用的是Frame组件对插件的导航
    /// <summary>
    /// DeviceView.xaml 的交互逻辑
    /// </summary>
    public partial class DeviceView : Page
    {
        public DeviceView()
        {
            InitializeComponent();
        }
传统开发
对于传统使用winform 或者WPF开发的同学,可以按照传统的方式开发
MVVM方式开发
由于使用了Caliburn.Micro. 试图会根据名称自动找到相应的viewmodel.
xxView>>>>>>xxViewModel
├─ ViewModels
│  └─ DeviceViewModel.cs
├─ Views
│  ├─ DeviceView.cs
└─ └─ DeviceView.xaml
命令
为什么程序中要使用命令?
主程序引入了DotNetty,并默认开启了18080端口作为websocket以及http。
当插件开发好后,尤其当我们开发的插件是硬件方便的时候,
我们希望用户能通过WEB,或者其他程序,使用统一的规则来访问我们的插件。
命令传输模型-Request
全局发送格式:(REQUEST)
{
    "Params": {},
    "ID": "xxxxxxx",
    "Action": "命令"
}
提示
Params:根据不同的命令传入不同的对象OBJECT类型
ID:string 类型 客户端发起命令的一个唯一凭据(存在多个命令同时发起)。 返回的时候由于硬件服务是异步返回,根据发起的命令返回相应的ID, 这样客户端知道是哪一个命令的返回。
Action: string类型
命令传输模型-Response
全局返回格式:(RESPONSE,CALLBACK)
{
    "errCode": 0,
    "errText": "",
    "params": {
        "Source": “”,
        "Result": {}
    },
    "ID": "xxxxxxx",
    "Action": "命令"
}
提示
errCode: 为0的时候意味存在错误,可以查看errText
Params:如果没有返回值,此节点可能为 null Source:来源设备。 Result:根据不同的命令返回不同的对象OBJECT类型。
ID:Request传来的ID
Action: RESPONSE会根据REQUEST照样返回。 CALLBACK会不一样相当于服务端主动发送消息给客户端。
命令的执行方式?
命令返回都是异步方式
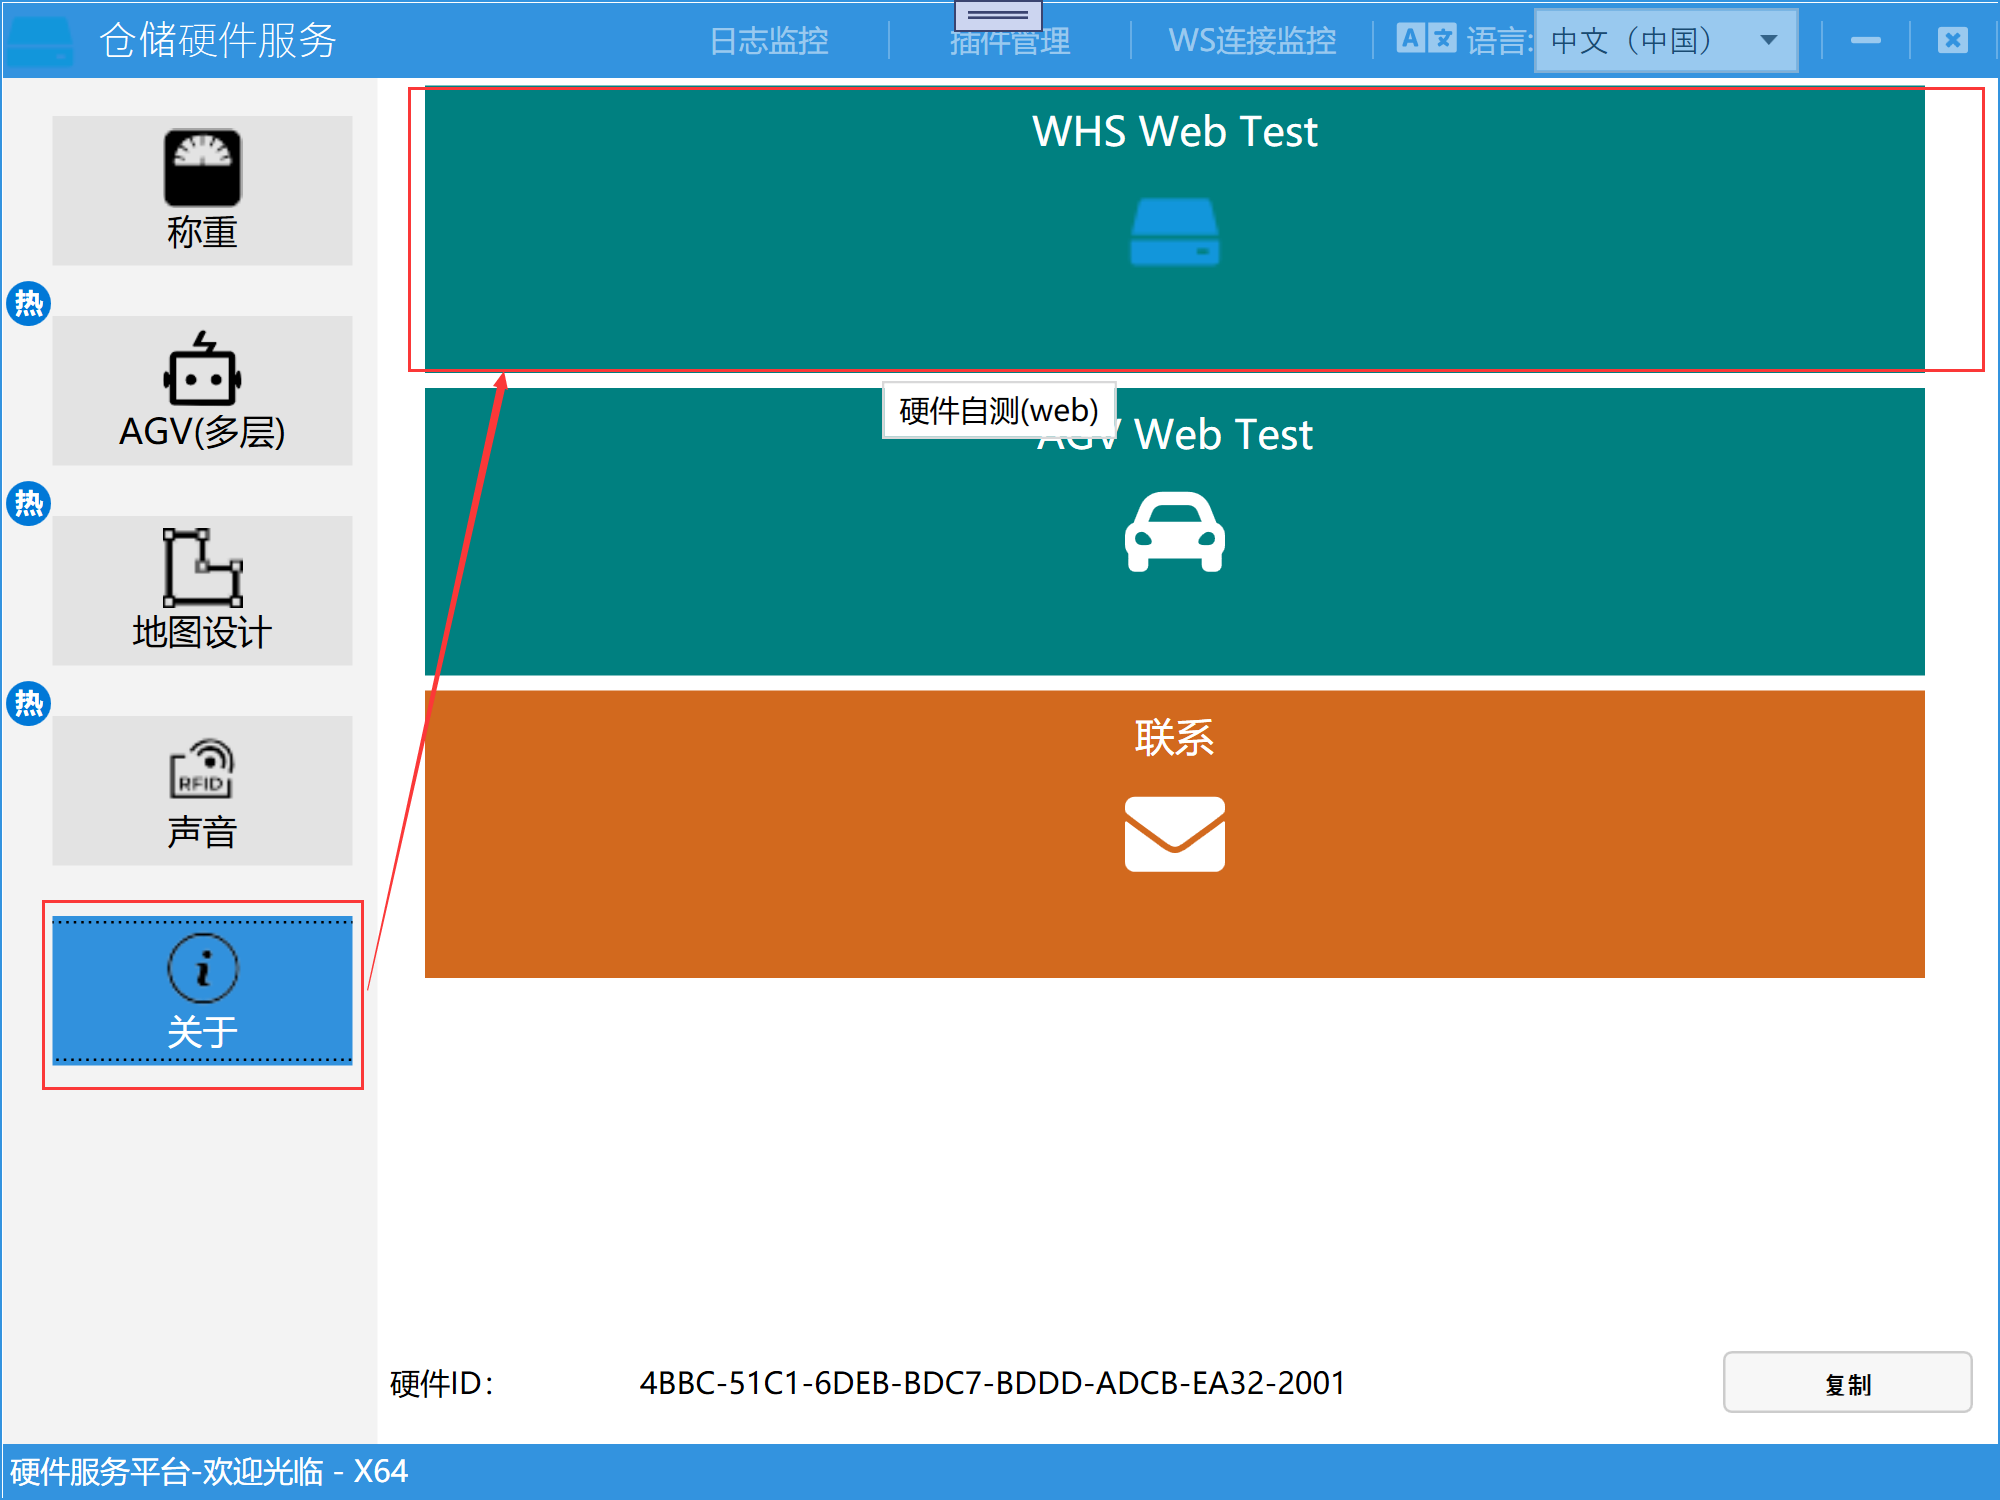
自测工具
用户可以在程序里面点击关于->WHS WEB Test
如图:
热加载
vs2019以上的版本已经支持hot reload 为什么插件还需要一个热加载? 当程序反射子插件的时候常规加载方式: 主程序运行的时候,如果插件存在更新,需要关闭主程序才能应用新的插件. 热加载的理念是: 主程序运行的时候,如果插件存在更新,不需要关闭主程序也能加载新的插件内容.
<plugin>
   <file name="xxxxxxxx.dll"/>
  <!--anycpu  x64 x86  arm arm64 wasm -->
  <runPlatform target="anycpu" />
  <enableHotReload>true</enableHotReload>
</plugin>
提示
enableHotReload 设置为true代表热加载
注意
当插件开发使用到pinvoke.net的方式加载C或者C++的文件的时候。
需要设置enableHotReload为false
高级
插件拦截
举例:当插件加载的时候,需要通过http访问服务端获取到token
    public class AuthPulginInterceptor : IPluginInterceptor
    {

        public void AfterHandle()
        {

        }

        public bool PreHandle(MessageRequest requestmessage)
        {
            if (PluginContext.AuthModel == null)
            {
                var view = GlobalContext.SimpleContainer.GetInstance<ViewModels.PrintViewModel>();

                try
                {
                    var client = new FluentClient(ServerSettings.ApiUrl);
                    var response = client.GetAsync(PluginContext.AuthAddress)
                       .WithArgument("ClientId", "WHS#" + HardwareID.Value())
                       .WithArgument("ClientSecret", HardwareID.Value())
                       .WithArgument("GrantType", "client_credential")

                       .WithOptions(true, true)
                       .AsResponse().Result;
                    client.Dispose();

                    if (response.Status == System.Net.HttpStatusCode.OK)
                    {
                        PluginContext.AuthModel = response.As<AuthModel>().Result;
                        view.PrintStatusBrush = Brushes.Blue;
                        view.PrintStatus = "连接打印服务成功";
                        view.BtnVisibility = Visibility.Hidden;
                        return true;
                    }
                    else
                    {
                        view.PrintStatusBrush = Brushes.Red;
                        view.PrintStatus = "无法连接打印服务";
                        view.BtnVisibility = Visibility.Visible;
                        ErrorMessageModel messageModel = response.As<ErrorMessageModel>().Result;
                        MessageResponse res = new MessageResponse();
                        res.ID = requestmessage.ID;
                        res.ChannelID = requestmessage.ChannelID;
                        res.Action = requestmessage.Action;
                        res.errCode = messageModel.Code;
                        res.errText = messageModel.Message + "。请复制关于界面的硬件ID,联系管理员";
                        EnvironmentManager.Instance.PostResponseMessage(res);
                        return false;
                    }
                }
                catch (Exception ex)
                {
                    view.PrintStatusBrush = Brushes.Red;
                    view.PrintStatus = "无法连接打印服务(异常)";
                    view.BtnVisibility = Visibility.Visible;
                    MessageResponse res = new MessageResponse();
                    res.ID = requestmessage.ID;
                    res.ChannelID = requestmessage.ChannelID;
                    res.Action = requestmessage.Action;
                    res.errCode = 400;
                    res.errText = ex.Message;
                    EnvironmentManager.Instance.PostResponseMessage(res);
                    return false;
                }
            }
            return true;
        }
    }
在插件配置定义中注册拦截
public override void Init()
{
    ///xxxx
    base.RegistPulginInterceptor(new AuthPulginInterceptor());
    ///xxxx
}
HTTP请求拦截
举例:当HTTP访问的服务端返回未授权。重试一次,使用refreshtoken再次获取到新的token,并重提交档次失败的数据
    public class RetryTokenCoordinator : IRequestCoordinator
    {
        public Task<HttpResponseMessage> ExecuteAsync(IRequest request, Func<IRequest, Task<HttpResponseMessage>> dispatcher)
        {
            return Policy
               .HandleResult<HttpResponseMessage>(response =>
               {
                   return response.StatusCode == HttpStatusCode.Unauthorized;
               })
               .RetryAsync(1, async (response, retryCount, context) =>
               {
                   //刷新Token的逻辑
                   var client = new FluentClient(ServerSettings.ApiUrl);
                   var refreshResponse = await client.GetAsync(PluginContext.AuthAddress)
                    .WithArgument("ClientId", "WHS" + HardwareID.Value())
                    .WithArgument("ClientSecret", HardwareID.Value())
                    .WithArgument("GrantType", "refresh_token")
                    .WithArgument("RefreshToken", PluginContext.AuthModel.RefreshToken)
                    .WithOptions(true, true)
                    .AsResponse();
                   client.Dispose();
                   if (refreshResponse.Status == HttpStatusCode.OK)
                   {
                       //刷新成功后获取新的token 和 refresh_token等信息
                       PluginContext.AuthModel = await refreshResponse.As<AuthModel>();
                       //替换上次失败访问的token
                       await request.WithBearerAuthentication(PluginContext.AuthModel.Token);
                   }
               })
               .ExecuteAsync(() =>
               {
                   //执行上次的请求
                   return dispatcher(request);
               });
        }
    }
使用方式:
 var client = new FluentClient(ServerSettings.ApiUrl);
                    var templateResponse = client.GetAsync(PluginContext.TemplateAddress)
                       .WithArgument("printUid", printTask.PrintUID.ToString())
                       .WithBearerAuthentication(PluginContext.AuthModel.Token)
                       .WithHeader("CfgId", printTask.CfgId.ToString())
                       .WithRequestCoordinator(new RetryTokenCoordinator())
                       .WithOptions(true, true)
                       .AsResponse().Result;
                    client.Dispose();